In the world of controlled-environment agriculture, a greenhouse is more than just a structure; it’s a carefully calibrated ecosystem. Every aspect, from lighting and humidity to temperature, is meticulously managed to provide optimal conditions for plant growth. Yet, a silent saboteur often undermines these efforts and silently inflates utility bills: air leaks. Unseen gaps and cracks can compromise your greenhouse’s climate control, leading to energy waste, inconsistent growing conditions, and ultimately, reduced profitability. Understanding how to identify and effectively seal these hidden pathways is a crucial step towards achieving peak energy efficiency and creating a truly stable environment for your cherished plants.
Why Air Leaks Are a Greenhouse’s Silent Energy Thief
The primary function of a greenhouse is to create and maintain a microclimate distinct from the outside world. When air leaks are present, this delicate balance is continually disrupted, forcing your heating and cooling systems to work overtime. The consequences extend far beyond just higher utility bills:
- Increased Heating & Cooling Costs: This is the most direct and obvious impact. Warm air escapes in winter, and cool air escapes in summer, meaning your HVAC systems consume more energy trying to maintain set temperatures. This directly impacts your greenhouse’s overall energy efficiency.
- Inconsistent Temperatures: Drafts caused by air leaks create cold or hot spots, leading to uneven plant growth. Some plants might thrive while others struggle, making uniform crop management a challenge.
- Humidity Fluctuations: Leaks can allow outside air with different humidity levels to enter, making it difficult to regulate interior moisture. This can lead to issues like fungal diseases (if humidity is too high) or dehydration (if too low). Proper climate control relies on a sealed environment.
- Pest & Disease Entry: Small gaps are perfect entry points for unwanted insects, rodents, and airborne disease spores, compromising your pest management strategies and potentially harming your crops.
- Reduced CO2 Retention: For operations utilizing CO2 enrichment, air leaks mean valuable carbon dioxide escapes, diminishing its effectiveness and wasting the investment made in CO2 generation.
- Structural Deterioration: Persistent moisture intrusion through leaks can lead to rot in wooden frames or corrosion in metal structures over time, compromising the structural integrity of your greenhouse.
Common Culprits: Where Do Air Leaks Hide?
Air leaks aren’t always obvious. They can be subtle, hiding in plain sight or in areas you might not frequently inspect. Knowing where to look is the first step in effective sealing for improved energy efficiency:
- Vents and Louvers: These are designed to open and close, but over time, seals can degrade, hinges can warp, or mechanisms might not close completely. Gaps around their frames are common sources of heat loss or gain.
- Doors and Entry Points: Just like vents, greenhouse doors are frequently used and subject to wear and tear. Gaps around the door frame, deteriorated weatherstripping, or poor thresholds are major culprits.
- Polycarbonate Panel Seams: If your greenhouse uses multi-wall polycarbonate, the joints where panels meet the frame or each other are prime locations for leaks. The gaskets or sealants used during construction can dry out, crack, or shift.
- Poly Film Attachments: For film greenhouses, the points where the poly film is attached to the frame (e.g., wiggle wire channels, battens) can develop small tears or loosening, creating pathways for air.
- Foundation and Base: The area where the greenhouse structure meets its foundation or concrete base is a common entry point for cold air, especially if the foundation isn’t perfectly level or if sealants have degraded.
- Fan and Exhaust Openings: While fans are essential for ventilation, their housings and any associated shutters or louver systems can be sources of significant air leakage when not in operation.
- Utility Penetrations: Any opening in the greenhouse skin for pipes, electrical conduits, irrigation lines, or other utilities can allow air to pass through if not properly sealed.
- Ridge and Eave Connections: The highest point (ridge) and the lower edge where the roof meets the side walls (eaves) are complex junctions where materials often meet, creating opportunities for gaps.
Your Detective Kit: How to Identify Air Leaks
Becoming an air leak detective requires a combination of common sense, observation, and a few simple tools. Here’s how to systematically track down those energy-wasting culprits:
- The Visual Inspection: Start with your eyes. Walk around your greenhouse, both inside and out. Look for obvious gaps, cracks, or deteriorated materials. Check around doors, vents, and where the glazing meets the frame. Are there any visible tears in poly film? Are gaskets warped or missing? This simple step can reveal many easily fixable issues.
- The Hand Test: On a windy day, or when there’s a significant temperature difference between inside and outside, slowly move your hand around common leak areas (doors, vents, seams, utility penetrations). You might feel a distinct cold or warm draft.
- The Smoke Pen or Incense Test: This is a classic and highly effective method. Light a smoke pen (designed for air flow testing) or a stick of incense. Hold it near suspected leak areas on a calm day. If the smoke wavers, gets sucked in, or blows out, you’ve found an air leak. Perform this test from both inside and outside the greenhouse for comprehensive results.
- The Pressure Test (Fan Test): This advanced method can identify less obvious leaks. Seal all vents and doors, then use a powerful fan (like a box fan) to create either positive or negative pressure inside the greenhouse by blowing air in or sucking it out. With the pressure differential created, use your smoke pen or hand test to more easily detect air movement through even tiny gaps.
- Infrared Camera (Thermal Imaging): For larger operations or persistent problems, an infrared camera can be invaluable. It visually highlights temperature differences, showing exactly where warm air is escaping or cold air is entering. This allows for precise identification of thermal bridges and air leakage points. While an investment, it offers the most comprehensive mapping of energy loss.
- Water Test (for rainwater leaks): While primarily for water ingress, persistent water leaks often indicate air leaks too. During a rainstorm or by spraying water on the exterior, observe if any water penetrates the structure. Address these areas diligently.
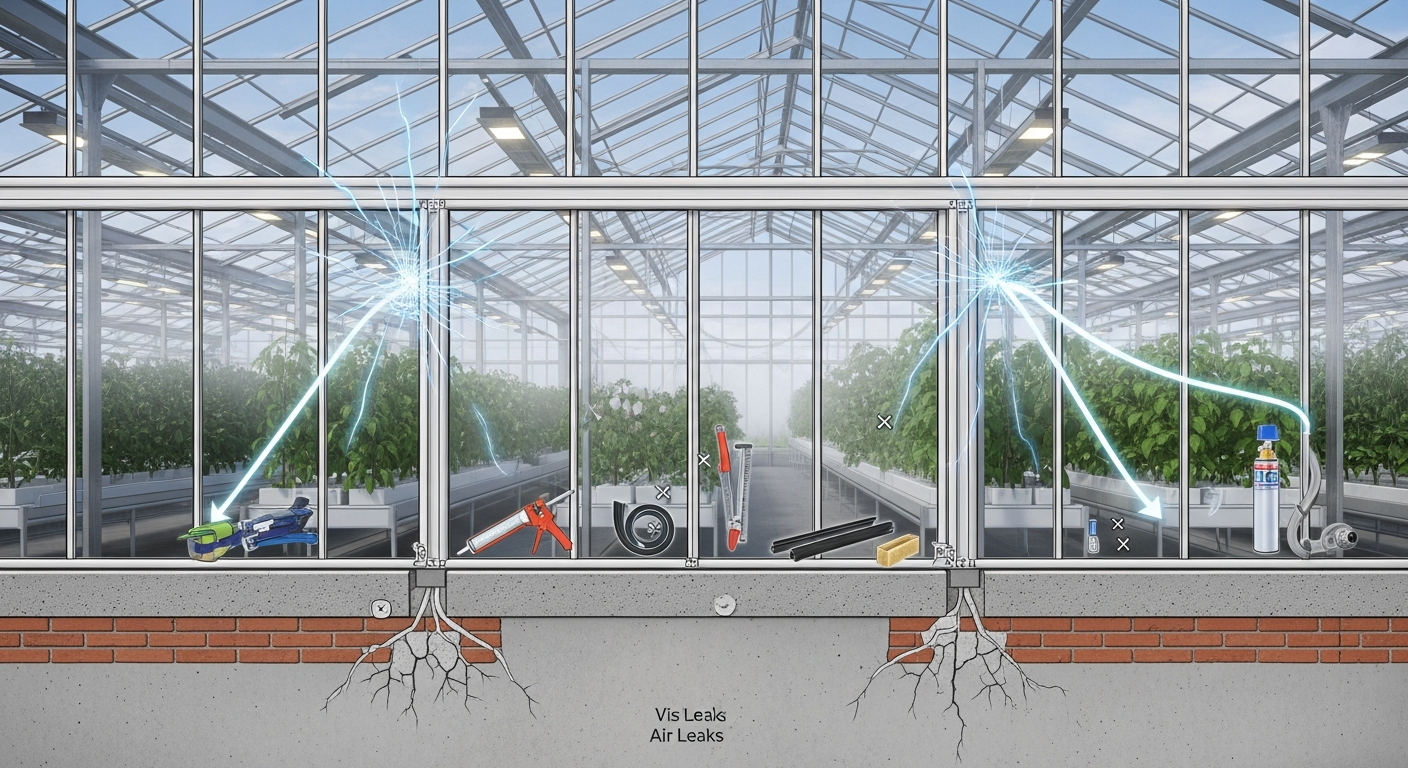
The Sealing Solution: Practical Fixes for a Tighter Greenhouse
Once you’ve identified your air leaks, it’s time to implement the fixes. The key is to choose the right material and technique for each specific type of leak, ensuring long-term durability and improved greenhouse climate control.
- Caulking and Sealants:
- Silicone Caulk: Excellent for sealing gaps around rigid panels (polycarbonate, glass), window frames, and structural joints. It’s flexible, durable, and resistant to UV radiation and temperature extremes. Choose a clear, mildew-resistant type for greenhouse applications.
- Acrylic Latex Caulk: More affordable and easier to clean up than silicone, but generally less durable and flexible. Best for smaller, less critical gaps or interior applications.
- Butyl Rubber Sealant: Often used for sealing metal-to-metal joints or flashings, offering good adhesion and flexibility.
Always ensure surfaces are clean and dry before applying caulk or sealant.
- Weatherstripping:
- Foam Weatherstripping: Ideal for sealing gaps around doors and vents that move. It comes in various thicknesses and is self-adhesive, providing a compression seal. Replace annually or as needed.
- Rubber Gasket Weatherstripping: More durable than foam, often used for permanent seals around vents or for replacement gaskets in polycarbonate panel systems.
- Brush or Fin Weatherstripping: Good for sliding doors or mechanisms where a tight seal is needed without impeding movement.
Measure carefully and apply weatherstripping to the moving part or frame, ensuring it compresses sufficiently when closed.
- Greenhouse Repair Tape:
- UV-Stabilized Polyethylene Repair Tape: Essential for patching tears in poly film or reinforcing seams in film greenhouses. This tape is specifically designed to withstand UV degradation and extreme temperatures, crucial for extending the life of your greenhouse covering and preventing heat loss.
- Butyl Tape: Useful for sealing larger gaps or attaching film to frames, offering a strong, waterproof, and flexible bond.
Clean the area thoroughly before applying tape to ensure maximum adhesion.
- Expanding Foam Sealants:
- Low-Expansion Foam: Use sparingly for filling larger voids around utility penetrations (pipes, wires) or where the foundation meets the frame. Avoid high-expansion foams, as they can deform lighter greenhouse structures. Once cured, trim excess and consider painting for UV protection.
- Gaskets and Specialized Seals:
- Many modern greenhouses use specific rubber or EPDM gaskets between panels or along structural elements. Inspect these regularly and replace any that are cracked, shrunken, or hardened. Sourcing replacement parts from your greenhouse manufacturer is often the best approach.
- Foundation Sealing:
- For gaps between the foundation and the greenhouse base, use a concrete repair caulk, mortar, or a specialized flashing system to create a tight seal, preventing both air and moisture intrusion.
Regular maintenance is key. Periodically inspect your greenhouse for new or developing leaks, especially after extreme weather events or significant temperature fluctuations. Proactive sealing for improved energy efficiency will save you money on utility bills, create a more stable and productive growing environment, and extend the lifespan of your greenhouse.
Taking control of air leaks in your greenhouse is a critical investment in its energy efficiency and overall performance. By systematically identifying common culprits, employing simple yet effective detection methods, and applying the right sealing solutions, you can significantly reduce energy waste, maintain a more consistent climate, and foster healthier, more robust plant growth. A tightly sealed greenhouse is a more cost-effective, sustainable, and productive environment, ensuring your dedication to climate control translates into tangible benefits for your plants and your pocketbook. Make air leak detection and sealing a regular part of your greenhouse maintenance routine, and enjoy the rewards of a truly optimized growing space.