The unseen enemy of energy efficiency and indoor comfort often lurks in plain sight: uncontrolled air movement. From subtle drafts to significant energy drains, air infiltration, or air leakage, allows conditioned air to escape and unconditioned air to intrude, wreaking havoc on a building’s performance. It’s a silent thief of heat in winter and a formidable foe against cooling in summer, contributing substantially to energy waste, inconsistent temperatures, and even moisture issues. As building science continues to evolve, understanding and implementing robust air infiltration control has become a cornerstone of sustainable and comfortable living. This article delves into the technical strategies and materials essential for effectively “sealing the gaps” and transforming leaky structures into high-performing, energy-efficient environments.
Understanding Air Infiltration: The Unseen Energy Drain
Before we can effectively combat air infiltration, we must first understand its nature and impact. Air infiltration refers to the uncontrolled flow of outdoor air into a building through cracks, gaps, and openings in the building envelope. This phenomenon is driven primarily by pressure differences between the inside and outside, caused by factors such as wind, stack effect (warmer air rising), and mechanical ventilation systems.
The Detrimental Impacts of Air Leakage
- Energy Waste: This is arguably the most significant impact. Heated or cooled air escapes, forcing HVAC systems to work harder and longer, leading to higher energy bills. Studies often show that air leakage can account for 25-40% of a home’s heating and cooling losses.
- Reduced Thermal Comfort: Drafts near windows, doors, and electrical outlets create uncomfortable cold spots in winter and warm spots in summer, making occupants feel less comfortable even when the thermostat is set appropriately.
- Moisture Problems: Uncontrolled air movement can transport moisture-laden air into wall cavities and attics. When this moist air comes into contact with cooler surfaces, it can condense, leading to mold growth, rot, and degradation of building materials.
- Compromised Indoor Air Quality (IAQ): While some fresh air is desirable, uncontrolled infiltration brings in outdoor pollutants like dust, pollen, allergens, vehicle exhaust, and other contaminants, negatively impacting IAQ.
- Increased HVAC Load: The constant exchange of air forces heating and cooling systems to work overtime, accelerating wear and tear and potentially shortening their lifespan.
Many homeowners and builders focus heavily on insulation, which is vital, but often overlook that insulation only reduces heat transfer by conduction and convection *through* solid materials. If air can bypass the insulation through gaps, its effectiveness is severely diminished. Therefore, air sealing must precede or accompany insulation efforts for optimal results.
Practical Tip: Consider air sealing as the foundation upon which effective insulation builds. Without a proper air barrier, even the thickest insulation will underperform. Prioritize identifying and sealing major leakage points before adding more insulation.
Identifying Leakage Pathways: The Diagnostic Approach
Effective air infiltration control begins with accurate identification of leakage pathways. A systematic diagnostic approach is crucial to pinpoint where air is entering and exiting the building envelope. Guesswork can be costly and inefficient.
Advanced Diagnostic Tools
- Blower Door Test: This is the gold standard for assessing a building’s airtightness. A large fan is mounted in an exterior doorway, depressurizing the house. As air is pulled into the building through all its leaks, the fan’s flow rate and pressure readings quantify the total air leakage. Technicians can then use smoke pencils or infrared cameras to visualize exactly where air is entering. The result, often expressed as ACH50 (air changes per hour at 50 Pascals), provides a critical metric for a building’s airtightness.
- Infrared (IR) Thermography: Infrared cameras reveal temperature differences on surfaces, making cold drafts (in winter) or warm air intrusion (in summer) visible as distinct color gradients. This is particularly effective for identifying hidden bypasses and leaks within wall cavities or behind finished surfaces.
- Smoke Pencils/Puffers: These simple tools release a small stream of harmless smoke or vapor that reveals air movement around suspected leak sites, such as electrical outlets, window frames, or attic hatches.
Common Air Leakage Points
While every building is unique, certain areas are notoriously prone to air leakage:
- Attic and Ceiling Leaks:
- Penetrations for wiring, plumbing vents, chimney chases.
- Recessed light fixtures, attic access hatches.
- Top plates of interior and exterior walls where drywall meets the ceiling.
- Dropped soffits and bulkheads.
- Wall Leaks:
- Behind knee walls and furred-down ceilings.
- Electrical outlets and switch plates on exterior walls.
- Utility penetrations for pipes, wires, and vents (dryer, exhaust fans).
- Cracks in siding, foundations, and mortar joints.
- Foundation and Floor Leaks:
- Rim joists and sill plates in basements or crawl spaces.
- Utility penetrations in floors.
- Cracks in the foundation slab or walls.
- Windows and Doors:
- Gaps around window and door frames.
- Between movable sashes and fixed frames.
- Underneath exterior doors (lack of proper door sweeps).
- Ductwork: Leaky return and supply ducts, especially those running through unconditioned spaces (attics, crawl spaces), can pull in unconditioned air or lose conditioned air.
Actionable Advice: For DIYers, a simple visual inspection during windy conditions can reveal many leaks. Hold a lit incense stick or a feather near suspected areas. If the smoke or feather moves, you’ve found a leak! Don’t forget to check less obvious places like pet doors and dryer vents.
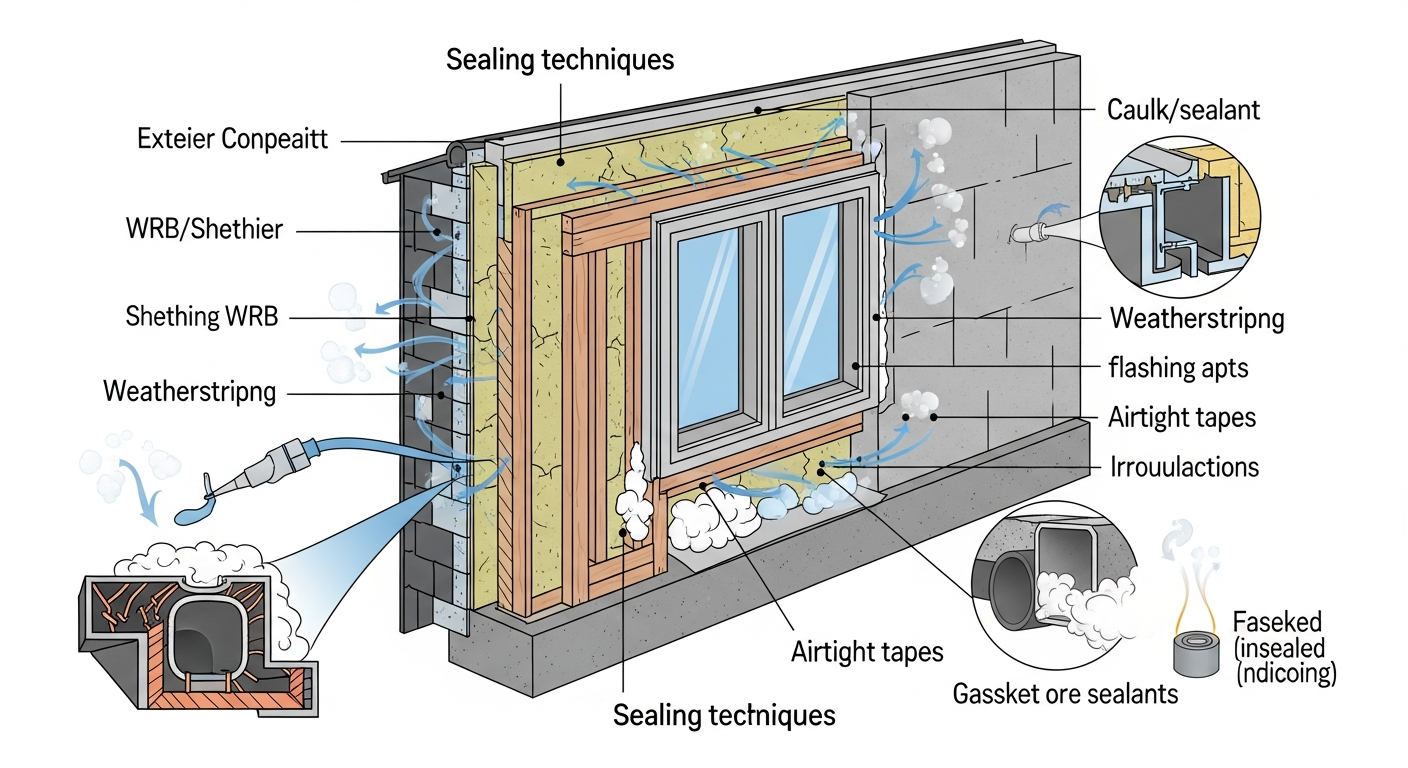
Core Air Sealing Strategies and Materials
Once leakage points are identified, the next step is to choose the appropriate technical solution and materials. A combination of strategies is usually required to achieve comprehensive air sealing.
1. Weatherstripping and Door Sweeps
- Application: Ideal for movable components like windows and doors.
- Types:
- V-Strip (Spring Bronze/Plastic): Flexible, durable, and good for double-hung windows.
- Foam Tape: Easy to install, but can compress over time. Best for low-traffic areas or less critical gaps.
- EPDM Rubber/Silicone: More durable and resilient than foam, suitable for high-traffic doors and windows. Available in various profiles (bulb, fin, compression).
- Door Sweeps/Bottom Seals: Attached to the bottom of doors to seal the gap with the threshold. Types include brush, vinyl flap, and automatic (spring-loaded) sweeps.
- Installation Tips: Ensure surfaces are clean and dry. Choose weatherstripping that compresses slightly when the window/door is closed, creating a tight seal without impeding operation.
2. Caulks and Sealants
- Application: Perfect for sealing small cracks, gaps, and stationary joints (e.g., around window frames, where trim meets walls, plumbing penetrations).
- Types:
- Acrylic Latex Caulk: Easy to apply and clean up with water, paintable, but less flexible and durable for outdoor use or high-movement joints. Good for interior trim.
- Silicone Caulk: Excellent flexibility, water resistance, and durability. Ideal for bathrooms, kitchens, and exterior applications. However, it’s not paintable and requires mineral spirits for cleanup.
- Polyurethane Sealant: Highly durable, flexible, and adhesive. Excellent for exterior applications, sealing around foundations, and areas with significant movement. Often paintable, but can be messy to work with.
- Installation Tips: Clean surfaces thoroughly. Use a caulk gun with an even, steady hand. Tool the bead with a wet finger or caulk tool for a smooth, effective seal.
3. Expanding Foams
- Application: Filling larger, irregular gaps and penetrations (e.g., around pipes, electrical wires, HVAC ducts where they pass through walls/floors, rim joists).
- Types:
- Low-Expansion (Window and Door Foam): Specifically formulated not to bow or warp frames. Ideal for sealing around new window and door installations.
- High-Expansion (Great Stuff® type): Expands significantly to fill large voids. Use with caution, as over-expansion can cause damage. Best for non-structural gaps in attics, basements, and around larger penetrations.
- Fire-Rated Foam: For sealing around fire-rated assemblies like chimneys or electrical boxes in firewalls.
- Installation Tips: Wear gloves and eye protection. Follow manufacturer instructions for curing and application. Trim excess foam once cured.
4. Gaskets and Specialty Tapes
- Application: For areas requiring a compressible seal or a continuous air barrier.
- Types:
- Foam Gaskets: Available for electrical outlets, switch plates, and utility boxes. Easy to install and highly effective.
- Self-Adhering Membranes/Tapes: Used around windows, doors, and sheathing joints to create a continuous air barrier. Examples include flashing tapes and specialized housewrap tapes.
- Acoustic Sealants: Often used in conjunction with drywall for enhanced airtightness, especially at wall-to-ceiling and wall-to-floor junctions.
Practical Tip: When choosing sealants, always consider the joint’s movement. High-movement joints require more flexible sealants like silicone or polyurethane, while low-movement joints can use acrylic latex. For exterior applications, prioritize UV resistance and durability.
Advanced Techniques and Whole-House Performance
Achieving a truly airtight building often requires looking beyond superficial cracks and addressing systemic issues within the building envelope. These advanced techniques integrate air sealing into a holistic approach to building performance.
1. Sealing Attic Bypass Leaks
The attic is often the “leakage highway” of a home. Warm air rises through penetrations in the ceiling into the attic, pulling in cold air from below. Addressing these attic bypass leaks is critical:
- Dropped Soffits and Bulkheads: These often create open pathways from the living space to the attic. Seal the top and sides with rigid foam board and expanding foam/caulk.
- Plumbing and Electrical Chases: Large holes around pipes and wires. Use expanding foam for smaller gaps and rigid foam with caulk for larger openings.
- Recessed Lights: If not IC-rated (insulation contact) and airtight, these are major leakage points. Replace with airtight LED versions or build airtight boxes around existing ones, sealing to the ceiling drywall.
- Attic Access: Weatherstrip the hatch and add a layer of rigid foam insulation to the top of the hatch cover.
2. Ductwork Sealing
Leaky HVAC ducts can negate the benefits of a well-sealed building envelope. Ducts running through unconditioned spaces (attics, crawl spaces) are particularly problematic.
- Mastic Sealant: A paint-like goo applied with a brush, ideal for sealing all seams and connections on ductwork. It provides a durable, long-lasting seal.
- Foil Tape: UL-listed foil tape can be used on straight seams and connections, but ensure it’s not simply “duct tape” (which degrades quickly).
- Focus Areas: Prioritize sealing connections at the air handler, supply and return plenums, and all branch connections.
3. Foundation and Rim Joist Sealing
The interface between the foundation and the first floor framing (the rim joist and sill plate) is a significant source of air leakage and often overlooked.
- Materials: Expanding foam, rigid foam board cut to fit and sealed with foam, or even housewrap integrated with an exterior air barrier.
- Process: Clean the area thoroughly. For existing homes, remove any loose insulation in the rim joist cavity, seal all gaps, then re-insulate with rigid foam or spray foam.
4. Mechanical Ventilation and IAQ
As buildings become more airtight, the need for controlled mechanical ventilation increases. Tightly sealed homes retain pollutants more effectively, making proper ventilation critical for maintaining healthy indoor air quality.
- HRVs (Heat Recovery Ventilators) and ERVs (Energy Recovery Ventilators): These systems bring in fresh outdoor air while recovering heat (HRV) or both heat and humidity (ERV) from the exhaust air, minimizing energy loss. They are essential for balancing air sealing with indoor air quality in modern, airtight construction.
Actionable Advice: For complex or extensive air sealing projects, especially those involving attics, crawl spaces, or ductwork, consider hiring a certified energy auditor or building performance contractor. They have the expertise and tools to ensure a thorough and effective job.
Conclusion
Mastering air infiltration control is a critical step towards creating truly high-performance buildings. By understanding the dynamics of air movement, diligently identifying leakage pathways, and employing the right technical strategies and materials, homeowners and builders can achieve remarkable improvements in energy efficiency, thermal comfort, and indoor air quality. From simple weatherstripping to advanced blower door-guided sealing, each technical approach contributes to a tighter, more resilient building envelope. While the initial investment in air sealing may seem significant, the long-term benefits in energy savings, enhanced comfort, and a healthier indoor environment make it one of the most impactful upgrades a building can receive. Start your air sealing journey today – your comfort, wallet, and the planet will thank you.