In the world of greenhouse cultivation, maintaining a stable and optimal climate is paramount. It directly impacts plant health, growth rates, and ultimately, your bottom line. But what if you’re constantly battling fluctuating temperatures, struggling to keep heating costs down, and wondering where all that expensive energy is disappearing to? The culprit is often elusive: heat leaks. These invisible escape routes for warmth can silently drain your resources and undermine your climate control efforts. Fortunately, there’s a powerful tool that can make the invisible visible, helping you pinpoint exactly where your energy is escaping: thermal imaging.
The Hidden Costs of Heat Leaks in Your Greenhouse
Heat leaks in a greenhouse are more than just a minor annoyance; they represent a significant drain on resources and can severely impact your cultivation success. Understanding their multifaceted costs can motivate you to take action:
- Exorbitant Energy Bills: This is the most obvious and immediate cost. Every bit of heat that escapes your greenhouse needs to be replaced, meaning your heating systems work harder and consume more fuel or electricity. Over a season, these cumulative losses can amount to substantial financial waste.
- Inconsistent Plant Growth: Drafts and cold spots created by heat leaks lead to uneven temperatures within the greenhouse. Plants exposed to these colder zones will experience stress, stunted growth, or even die-back, leading to patchy harvests and reduced yields. Optimal climate control is essential for uniform crop development.
- Increased Disease Risk: Cold spots and temperature fluctuations can lead to condensation, raising humidity levels in localized areas. This creates an ideal breeding ground for fungal diseases like powdery mildew, botrytis, and various bacterial issues, requiring additional treatments and potentially causing crop loss.
- Structural Deterioration: Persistent moisture intrusion at leak points can accelerate the degradation of your greenhouse structure, leading to rust, rot, or sealant failure, potentially shortening the lifespan of your valuable investment.
- Environmental Impact: Wasted energy contributes to a larger carbon footprint. By improving your greenhouse energy efficiency, you’re not just saving money; you’re also contributing to a more sustainable operation.
Traditional methods of finding these leaks – feeling for drafts or visual inspection – are often inadequate because many leaks are subtle or occur in hard-to-reach areas. This is where the precision of an infrared camera becomes invaluable.
What is Thermal Imaging and How Does It Work?
Thermal imaging, also known as infrared thermography, is a non-contact technology that detects infrared energy (heat) emitted by an object and converts it into an image. Unlike a regular camera that sees visible light, a thermal camera “sees” heat. Every object with a temperature above absolute zero emits some amount of infrared radiation; the hotter the object, the more radiation it emits.
Here’s a simplified breakdown of how it works in the context of your greenhouse:
- Detection: An infrared camera contains a special lens that focuses infrared energy emitted from all the objects in its field of view onto a detector array.
- Conversion: The detector elements absorb the infrared radiation and convert it into electrical signals.
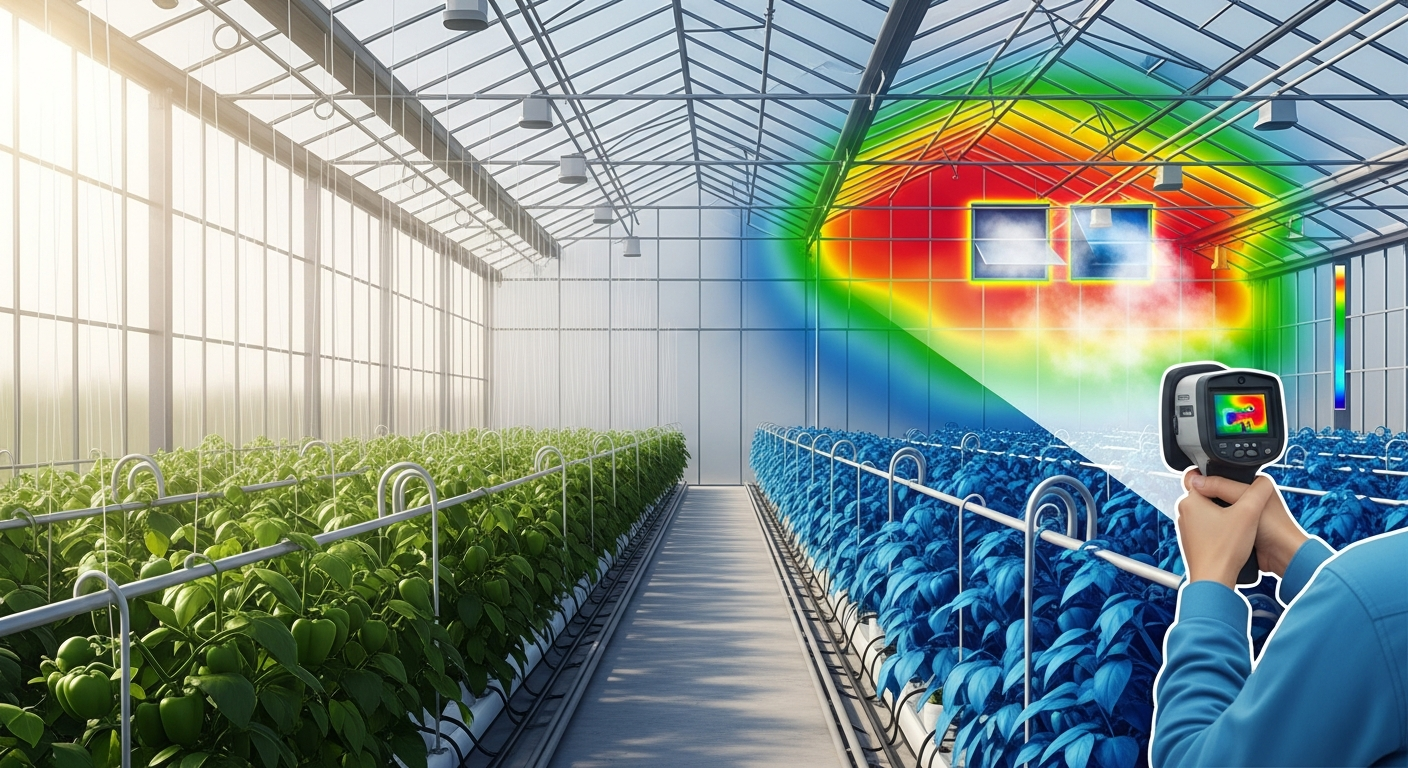
- Processing: These signals are then processed by the camera’s electronics to create a “thermogram” – an image where different colors represent different temperatures. Typically, warmer areas appear as reds, oranges, and yellows, while cooler areas show up as blues, purples, and greens.
- Visualization: When warm air escapes your greenhouse through a crack, gap, or poorly insulated area, it creates a distinct thermal signature. The thermal camera will show this escaping heat as a bright, warm plume or a hot spot on your screen, making the invisible heat leak glaringly obvious.
This technology provides an instant, visual map of surface temperatures, allowing you to quickly identify thermal anomalies that signify poor insulation, structural deficiencies, or significant heat loss.
Step-by-Step Guide: Conducting a Thermal Survey of Your Greenhouse
Performing a thermal survey of your greenhouse doesn’t require advanced degrees, but it does benefit from a systematic approach to ensure accuracy and effectiveness.
Choosing the Right Thermal Camera
- Resolution: Higher resolution cameras provide more detailed images, making it easier to pinpoint smaller leaks. While professional-grade cameras offer the best resolution, entry-level models or even smartphone attachments can be sufficient for many greenhouse applications.
- Temperature Range & Sensitivity: Ensure the camera can accurately measure the temperature differences you expect (e.g., between warm interior and cold exterior). Higher sensitivity (NETD values) means it can detect smaller temperature variations.
- Emissivity Settings: The camera should allow you to adjust emissivity, which is how well a material emits thermal radiation. Different greenhouse materials (glass, polycarbonate, metal) have different emissivities, and adjusting this ensures more accurate temperature readings.
- Rental vs. Purchase: For a one-off survey, renting a professional thermal camera might be cost-effective. If you plan regular inspections or have a large commercial greenhouse, purchasing one could be a worthwhile investment for ongoing predictive maintenance.
Optimal Conditions for a Thermal Scan
The success of your thermal survey heavily relies on creating the right environmental conditions:
- Significant Temperature Difference: Ideally, there should be at least a 10-15°C (18-27°F) difference between the inside and outside of your greenhouse. This makes heat leaks much more pronounced. Cold winter nights with a heated interior are perfect.
- Low Wind: Wind can cool surfaces unevenly and dissipate thermal signatures, making leaks harder to detect. Choose a calm day or night.
- Avoid Direct Sunlight: Solar radiation can heat surfaces, creating false positives and obscuring actual heat leaks. Perform your scan at dawn, dusk, or during the night for the most accurate results. Overcast days can also work.
- Consistent Internal Temperature: Ensure your greenhouse heating system has been running consistently for several hours before the scan to create stable internal temperatures.
Key Areas to Inspect
Approach your thermal survey systematically, covering all potential weak points in your greenhouse structure:
- Glazing Panels and Their Seals: This is often the primary culprit. Carefully scan all seams, overlaps, and the edges where glazing meets the frame. Look for bright, warm lines indicating air leakage.
- Doors and Vents: Pay close attention to weatherstripping, hinges, latches, and the frames themselves. Gaps around these moving parts are common sources of drafts and poor climate control.
- Foundation and Base Walls: Heat can escape where the greenhouse structure meets the ground, especially if the foundation is not properly insulated or sealed.
- Roof and Ventilation Systems: Inspect roof vents (even when closed), ridge caps, and any junctions in the roof structure.
- Utility Penetrations: Check around pipes, electrical conduits, and irrigation lines where they pass through walls or the foundation. These are common sites for air gaps.
- Internal Walls/Dividers: If you have separate climate zones within your greenhouse, inspect the dividing walls for leaks between zones.
Interpreting the Images
Once you have your thermal images, learning to interpret them is key:
- Look for Patterns: Heat leaks often appear as distinct plumes, streaks, or localized hot spots (if viewing from outside, where heat is escaping) or cold spots (if viewing from inside, where cold air is entering).
- Compare Temperatures: Pay attention to the temperature scale on your camera display. Significant temperature differences across a short distance are usually indicative of a problem.
- Correlate with Visuals: Always take a standard visible-light photo alongside your thermal image. This helps you identify the exact location and nature of the thermal anomaly. What looks like a leak might just be a difference in material (e.g., a metal frame showing up differently than glass).
- Document Findings: Take clear photos, noting the location and severity of each identified leak. This documentation will be crucial for prioritizing repairs and tracking improvements in your greenhouse energy efficiency.
Beyond Leaks: Other Applications of Thermal Imaging in Greenhouses
While finding heat leaks is a primary benefit, thermal imaging offers several other valuable applications for enhancing your greenhouse operations:
- Plant Health Monitoring: Thermal cameras can detect subtle changes in plant temperature that indicate stress from drought, disease, or pests long before visual symptoms appear. A stressed plant may show an altered leaf temperature due to changes in transpiration.
- Electrical System Inspection: Overheating electrical components (e.g., wiring, ballasts, motors) can be safely identified with thermal imaging, preventing potential failures or fires.
- Underfloor Heating Diagnostics: For greenhouses using radiant floor heating, a thermal camera can quickly visualize the heat distribution pattern, identifying blockages, leaks, or uneven heating zones within the system.
- Irrigation System Checks: Detect leaks in buried irrigation lines by observing temperature anomalies in the soil surface above.
Implementing thermal imaging technology is a proactive step towards optimizing your greenhouse’s temperature management and energy consumption. It transforms guesswork into precise problem-solving, empowering you to make informed decisions that benefit your plants, your budget, and the environment.
Don’t let valuable heat escape unnoticed. By embracing thermal imaging, you can meticulously seal your greenhouse, drastically cut down on heating costs, and provide a more consistent, healthier environment for your crops. Invest in this powerful diagnostic tool and take control of your greenhouse climate today.