The dream of a lush, thriving small greenhouse can quickly turn into a sweltering nightmare during the warmer months. As temperatures outside climb, your enclosed growing space can rapidly become a scorching oven, threatening the health and vitality of your precious plants. Standard ventilation alone often isn’t enough to combat intense summer heat, and traditional air conditioning can be prohibitively expensive and energy-intensive for a small setup. Fortunately, there’s an ingenious, eco-friendly, and cost-effective solution widely used in horticulture: evaporative cooling pads. These simple yet powerful systems, often referred to as “swamp coolers,” leverage the natural process of evaporation to bring refreshing relief to your greenhouse, ensuring your plants remain happy and productive even on the hottest days.
Why Evaporative Cooling Pads are Ideal for Small Greenhouses
For small greenhouse owners, finding the right balance of temperature and humidity is crucial. Evaporative cooling offers several compelling advantages over other methods, making it particularly suitable for smaller-scale operations:
- Energy Efficiency: Unlike compressor-based air conditioners, evaporative coolers consume significantly less electricity. They primarily use power for a fan and a small water pump, resulting in lower operating costs and a smaller carbon footprint.
- Cost-Effective Installation: Setting up an evaporative cooling system is generally much more affordable than installing conventional AC. The components are readily available and often less expensive.
- Adds Beneficial Humidity: Many plants, especially tropical varieties, thrive in higher humidity levels. As water evaporates, it adds moisture to the air, which can be a significant benefit in dry climates or during periods of low humidity. This can reduce water stress on plants and promote healthier growth.
- Fresh Air Circulation: The pad-and-fan system constantly draws fresh air from outside, cools it, and circulates it through the greenhouse before expelling warm, stale air. This continuous air exchange helps prevent the buildup of pests, diseases, and stale air pockets.
- Simplicity and Reliability: With fewer complex moving parts than an air conditioner, evaporative cooling systems are generally more reliable and easier to maintain, making them perfect for DIY enthusiasts.
While shade cloth is excellent for reducing solar gain, and vents are essential for passive air exchange, neither can actively lower the air temperature inside a greenhouse as effectively as an evaporative cooling system when temperatures soar. Evaporative cooling pads actively cool the air, providing a more robust solution for intense heat.
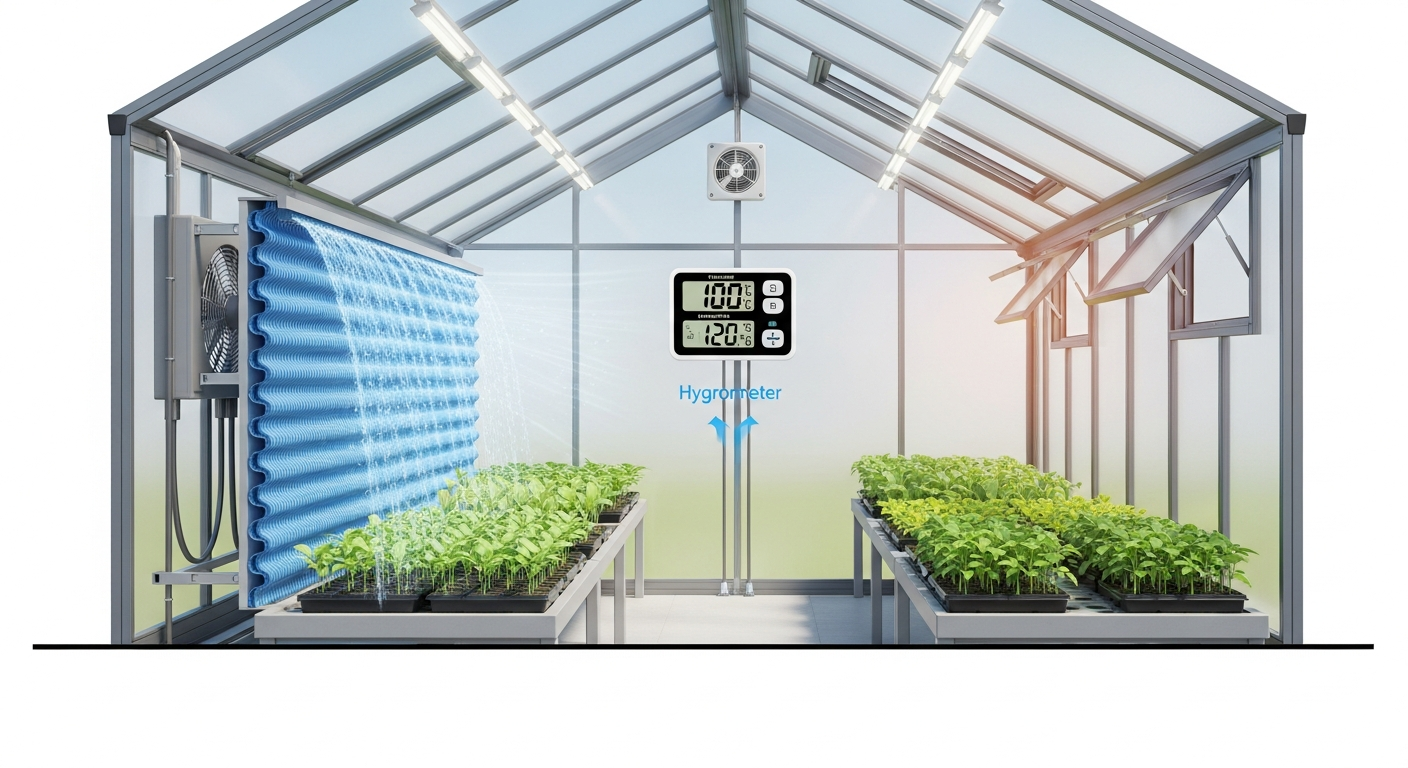
Understanding the Pad-and-Fan System: The Basics
At its core, an evaporative cooling system for a greenhouse is a “pad-and-fan” setup. It operates on a fundamental principle of physics: when water evaporates, it absorbs heat from its surroundings, causing a cooling effect. Imagine stepping out of a pool on a windy day – that chill you feel is evaporative cooling in action!
Essential Components You’ll Need
To implement an effective evaporative cooling system in your small greenhouse, you’ll need the following key elements:
- Evaporative Cooling Pads: These are typically made of fluted cellulose material or aspen fibers, designed to provide a large surface area for water evaporation. They come in various thicknesses and heights.
- Water Sump/Reservoir: A basin located directly beneath the cooling pads to hold water and collect runoff.
- Submersible Water Pump: To circulate water from the sump to the top of the cooling pads.
- Water Distribution Manifold: A pipe with small holes or emitters that evenly distributes water across the top edge of the cooling pads.
- Exhaust Fan: A powerful fan positioned on the opposite side of the greenhouse from the cooling pads. This fan pulls air through the pads and expels warm air.
- Frame for Pads: A structure to securely hold the cooling pads in place at one end of the greenhouse.
- Thermostat or Controller (Recommended): To automate the system, turning the fan and pump on/off based on desired temperature settings. A humidistat can also be integrated.
How the System Lowers Temperature
The process is straightforward and highly effective:
- The exhaust fan located at one end of your greenhouse creates a negative pressure, drawing hot, dry air from outside into the greenhouse.
- This air is pulled specifically through the wet evaporative cooling pads installed at the opposite end of the greenhouse.
- As the warm air passes through the constantly moistened pads, water molecules on the pad’s surface absorb heat from the air and transform into vapor (evaporate).
- This absorption of heat (known as the latent heat of vaporization) causes the temperature of the air to drop significantly.
- Cool, humidified air is then distributed throughout your small greenhouse.
- Finally, the exhaust fan expels the warmer, less humid air from the greenhouse, continuing the cycle and ensuring a constant flow of fresh, cool air.
Step-by-Step Guide to Installing Your Evaporative Cooling System
Installing an evaporative cooling system in a small greenhouse is a manageable DIY project. Careful planning is key to maximum efficiency.
Choosing the Right Pads and Fan
This is arguably the most critical step. The size and capacity of your pads and fan must be matched to your greenhouse’s volume to achieve adequate air changes per minute (ACPM).
- Calculate Greenhouse Volume: Measure your greenhouse’s length, width, and average height (L x W x H) in feet to get the cubic feet (CF).
- Determine Fan CFM (Cubic Feet Per Minute): For most small greenhouses, aiming for at least 1 ACPM is recommended, meaning the fan should move a volume of air equal to your greenhouse’s volume every minute. So, your fan’s CFM rating should be equal to or greater than your greenhouse’s cubic feet. For example, a 10’x12’x8′ greenhouse has a volume of 960 CF; you’d need a fan rated for at least 960 CFM.
- Select Cooling Pads: Choose pads that, when combined, offer a face area large enough for the air to pass through at a low velocity (around 250 feet per minute is ideal for efficient cooling). For the 960 CFM example, you’d need roughly 960 / 250 = 3.84 square feet of pad face area. Consider pad thickness (typically 4 or 6 inches) – thicker pads offer more evaporative surface.
Optimal Placement for Maximum Efficiency
Strategic placement is crucial for effective temperature regulation.
- Pads on One End, Fan on the Other: Install your cooling pads on one end wall of the greenhouse, preferably on the side facing the prevailing summer winds if possible, as this can aid airflow. The exhaust fan should be mounted on the exact opposite end wall. This ensures air travels the full length of the greenhouse, maximizing cooling and even distribution.
- Seal the Greenhouse: For the system to work efficiently, your greenhouse must be as sealed as possible. All other vents, doors, and gaps should be closed when the system is operating to ensure air is drawn *only* through the cooling pads.
- Pad Height: Position the pads so that the bottom is just above ground level and the top is as high as practical, allowing for good air distribution at plant level.
Setting Up the Water Circulation
Proper water flow is essential for continuous evaporation.
- Sump Installation: Place the water sump directly beneath the cooling pads. Ensure it’s level and capable of holding enough water for extended operation without refilling.
- Pump and Manifold: Install the submersible pump in the sump. Connect tubing from the pump to the water distribution manifold, which should run horizontally along the top edge of the cooling pads. Drill small, evenly spaced holes in the manifold or use drip emitters to ensure water drips uniformly down the entire face of the pads.
- Overflow and Drain: Include an overflow pipe in your sump to prevent flooding. Consider a drain valve for easy cleaning and winterization. You may also want a float valve connected to a water supply to automatically refill the sump.
Integrating with Ventilation
While the exhaust fan is integral to cooling, remember its role in general ventilation.
- Thermostat Control: Connect both your exhaust fan and water pump to a greenhouse thermostat. Set the desired maximum temperature. When the temperature inside the greenhouse exceeds this point, the thermostat will activate both the fan and the pump, initiating the cooling process.
- Hygrostat (Optional): For plants sensitive to humidity, consider adding a humidistat to your controller. This can override the pump if humidity levels become too high, allowing the fan to continue running for ventilation without adding moisture.
- Manual Override: Always have a manual switch to turn off the pump and/or fan for maintenance or when the system isn’t needed.
Maintenance and Optimization Tips for Longevity and Performance
Regular maintenance will ensure your evaporative cooling system performs optimally for years.
Regular Cleaning and Inspection
- Pad Cleaning: Over time, mineral deposits from water (especially hard water) can clog the pads, reducing efficiency. Periodically inspect the pads for white crusty buildup. Depending on your water quality, you may need to descale them with a mild acid solution (like vinegar) or replace them every 1-3 years.
- Sump and Pump Cleaning: Algae and sediment can accumulate in the sump and clog the pump filter. Drain and clean the sump regularly. Check and clean the pump impeller to ensure unimpeded water flow.
- Fan Inspection: Keep the fan blades clean and free of dust or debris for efficient operation. Check belts (if applicable) and motor for any signs of wear.
- Winterization: Before freezing temperatures arrive, drain the entire system (sump, pipes, pads). Remove the pump and store it indoors to prevent freezing damage. Allow the pads to dry completely to prevent mold or mildew growth over winter.
Water Quality and Algae Prevention
Poor water quality can significantly impact your system’s performance and longevity.
- Hard Water: If you have hard water, consider using a water softener or reverse osmosis system for the cooling pads, or be prepared for more frequent descaling and pad replacement.
- Algae Growth: Algae thrive in warm, wet conditions. To minimize algae in your sump and on pads:
- Keep the sump covered or shaded to reduce light exposure.
- Use a small amount of non-foaming algaecide specifically formulated for evaporative coolers (always follow manufacturer instructions).
- Ensure good airflow around the pads to help them dry out slightly when the system is off.
Humidity Monitoring and Adjustment
While added humidity is often a benefit, too much can lead to fungal issues for some plants.
- Monitor Humidity: Use a hygrometer to keep track of the relative humidity inside your greenhouse. Aim for levels appropriate for your specific plant collection (often 60-80% for many tropicals, lower for succulents or Mediterranean plants).
- Adjusting for High Humidity: If humidity becomes excessively high, you can:
- Run the exhaust fan alone (without the water pump) for a period to ventilate without adding moisture.
- Reduce the frequency or duration of the cooling cycle.
- Ensure proper spacing between plants to allow for good air circulation.
Mastering temperature and humidity control is fundamental to successful greenhouse growing. By investing in and properly maintaining an evaporative cooling pad system, you equip your small greenhouse with a powerful, efficient, and plant-friendly solution to beat the heat. This allows you to create an optimal microclimate, fostering vigorous growth and bountiful harvests, even when the summer sun is at its fiercest. Embrace the power of evaporation, and watch your small greenhouse thrive year-round!