As the mercury rises, many small greenhouse owners face a common dilemma: how to keep their precious plants cool without breaking the bank or creating a tropical rainforest. Traditional air conditioning is often overkill and prohibitively expensive for a small backyard setup, while misting systems can lead to excessive humidity and fungal issues. Enter the humble yet remarkably effective evaporative cooling pad system – a game-changer for maintaining optimal temperatures in small greenhouses. This article will guide you through understanding, installing, and maintaining an evaporative cooling system, ensuring your plants thrive even during the hottest months.
Understanding Evaporative Cooling for Small Greenhouses
Evaporative cooling, often referred to as “swamp cooling,” is an ancient and natural process that has been harnessed to create comfortable environments. For small greenhouses, it represents an energy-efficient and highly effective method of temperature regulation.
What is Evaporative Cooling?
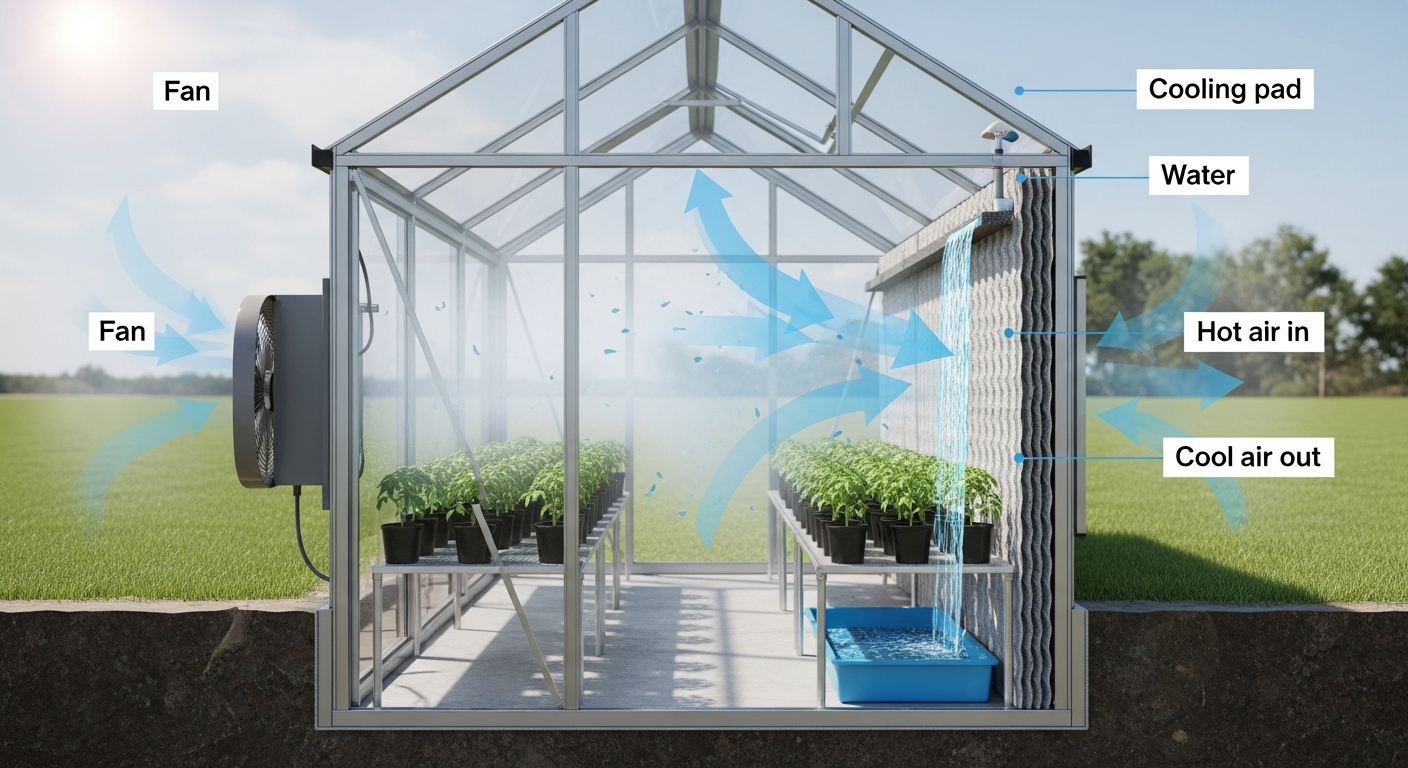
The core principle behind evaporative cooling is simple: when water evaporates, it absorbs heat from its surroundings. Think of how your body cools down when sweat evaporates from your skin – it’s the same phenomenon. In a greenhouse setting, an evaporative cooling system draws hot, dry air from outside through a series of moist pads. As the air passes over the wet surface of the pads, water evaporates, removing latent heat from the air. This process significantly lowers the air temperature before it enters the greenhouse, creating a cooler and more plant-friendly environment.
Unlike air conditioning, which uses refrigerants and a compressor, evaporative coolers rely solely on the physical process of water evaporation. This makes them significantly more energy-efficient and environmentally friendly. They also introduce a beneficial level of humidity, which is often crucial for the health of many greenhouse plants.
Why it’s Ideal for Small Greenhouses
- Cost-Effective: Evaporative cooling systems are considerably less expensive to install and operate than traditional air conditioning units, making them a budget-friendly choice for smaller greenhouse operations.
- Energy-Efficient: They consume far less electricity, primarily powering a small water pump and an exhaust fan, leading to lower utility bills.
- Increased Humidity: For many tropical plants, orchids, and seedlings, the added humidity provided by evaporative cooling is a significant benefit, preventing dehydration and stress.
- Simpler Installation: The components are generally less complex and easier to install in a smaller footprint compared to more elaborate cooling solutions.
- Fresh Air Exchange: The system continuously draws in fresh outdoor air, ensuring good ventilation and preventing stale air buildup.
It’s important to note that evaporative cooling is most effective in climates with low to moderate humidity. In regions with already high ambient humidity, the cooling effect will be diminished because the air is already saturated with moisture and cannot absorb much more through evaporation. However, for most small greenhouse enthusiasts, it offers a robust solution for hot climates.
Components of an Evaporative Cooling System
A typical evaporative cooling system for a small greenhouse consists of a few key components working in unison to create a controlled climate. Understanding each part is essential for proper setup and maintenance.
The Cooling Pads
These are the heart of the system. Evaporative cooling pads are designed with a large surface area to maximize water-to-air contact. The most common material is specially treated cellulose (Kraft paper), often impregnated with resins to enhance durability and prevent rotting. Synthetic pads are also available but less common for greenhouse applications.
Pads come in various thicknesses and flute angles, which influence their cooling efficiency and airflow resistance. For small greenhouses, standard 4-inch or 6-inch thick pads are usually sufficient. They are typically installed in a frame on one side of the greenhouse, acting as the air intake.
Water Supply and Distribution
To keep the pads wet, a continuous water supply is needed. This usually involves:
- A Sump or Reservoir: A basin located beneath the cooling pads collects water that drips off the pads.
- A Submersible Pump: This pump, placed in the sump, circulates water up to a header pipe.
- A Header Pipe: Running along the top of the pads, this pipe has small holes or emitters that evenly distribute water across the entire surface of the cooling pads.
The system is recirculating; water that flows down the pads collects in the sump and is pumped back up. A float valve connected to a fresh water line (e.g., garden hose) maintains the water level in the sump as water evaporates.
Exhaust Fans
The exhaust fan is critical. It pulls hot air from outside the greenhouse, through the wet cooling pads, and then expels the now-cooled air out of the greenhouse from the opposite side. The size and power of the fan are determined by the volume of your greenhouse.
To properly size an exhaust fan, you need to calculate the Cubic Feet per Minute (CFM) required. A good rule of thumb for greenhouses is to aim for a complete air exchange every 1-2 minutes.
Greenhouse Volume (L x W x H in feet) / Air Exchange Rate (minutes) = Required Fan CFM
For example, a 10’x8’x7′ greenhouse (560 cubic feet) would need a fan with at least 280-560 CFM (560 CFM for 1-minute exchange, 280 CFM for 2-minute exchange). Always opt for a fan that slightly exceeds your minimum requirement.
Controls and Accessories
- Thermostat: This device automatically turns the exhaust fan and water pump on and off based on the set temperature, ensuring efficient operation.
- Humidistat (Optional but Recommended): A humidistat monitors the humidity level and can override the system to prevent excessive moisture buildup, which is particularly useful in already humid conditions.
- Inlet Louvers/Shutters: These are typically installed on the exhaust fan to prevent air from entering when the fan is off and to provide an airtight seal.
- Timers: Can be used for specific watering schedules or fan operation.
Step-by-Step Installation and Setup for Small Greenhouses
Setting up an evaporative cooling system in a small greenhouse is a manageable DIY project for most enthusiasts. Careful planning and execution will ensure optimal performance.
Planning and Sizing Your System
- Measure Your Greenhouse: Accurately determine its length, width, and height to calculate the total cubic footage. This is crucial for sizing your exhaust fan.
- Calculate Fan CFM: As discussed, aim for 1-2 minute air exchange. Use the formula:
Greenhouse Volume / 1 or 2 = CFM. - Determine Pad Area: A general guideline is 1 square foot of cooling pad for every 150-200 CFM. So, if your fan is 500 CFM, you’ll need approximately 2.5-3.3 square feet of pad area.
- Choose Locations: Ideally, place the cooling pads on the north or east wall to minimize direct sun exposure on the pads. The exhaust fan should be on the opposite wall (south or west).
- Consider Water and Drainage: Plan for a reliable water source for your float valve and a way for overflow or bleed-off water to drain away from your greenhouse.
Pad and Frame Installation
Once you have your pads, frame, and sump, it’s time to install:
- Build/Install Frame: Securely attach the cooling pad frame to your greenhouse structure. Ensure it is level and provides an airtight seal around the edges. Any gaps will allow uncooled air to bypass the pads.
- Install Pads: Carefully slide the cooling pads into the frame. They should fit snugly.
- Sump Placement: Position the water sump directly beneath the pads to catch all the water runoff.
Water System Setup
- Install Pump: Place the submersible pump in the sump. Connect it to the header pipe that runs along the top of the pads.
- Header Pipe Setup: Ensure the header pipe is level and that the drippers or holes are spaced evenly to provide uniform water distribution across the entire pad surface. You want the pads to be thoroughly wetted but not oversaturated to the point of excessive splashing.
- Connect Water Supply: Install the float valve in the sump and connect it to your fresh water supply (e.g., a garden hose or plumbed line).
- Drainage: If your system includes a bleed-off or overflow pipe, ensure it leads to an appropriate drainage area away from the greenhouse foundation.
Exhaust Fan Installation
- Mount Fan: Install the exhaust fan on the opposite wall from the cooling pads. Ensure it’s securely mounted and that the opening for the fan is sealed to prevent air leaks around the edges.
- Louver Installation: If your fan didn’t come with integrated shutters, install external louvers or shutters to prevent air entry when the fan is off.
Wiring and Controls
- Electrical Safety: If you’re not comfortable with electrical work, hire a qualified electrician. All wiring should be waterproof and appropriate for greenhouse conditions.
- Connect Components: Wire the exhaust fan and the water pump to your thermostat. The thermostat will control when both components activate based on the desired greenhouse temperature.
- Add Humidistat (Optional): If using a humidistat, wire it in series with the pump to prevent it from running if humidity levels are already too high.
- Test the System: Once wired, fill the sump with water and test the system by setting the thermostat to a temperature above the current greenhouse temperature to see if the fan and pump activate.
Maximizing Efficiency and Maintenance
To get the most out of your evaporative cooling system and ensure its longevity, regular maintenance and optimization are key.
Optimizing Performance
- Unobstructed Airflow: Ensure there’s a clear path for air to travel from the cooling pads to the exhaust fan. Avoid placing tall plants or obstacles directly in front of either component.
- External Shading: Even with an evaporative cooler, external shade cloth (e.g., 30-50% shade) can significantly reduce the heat load on your greenhouse, allowing the cooling system to work more efficiently and consume less energy.
- Water Quality: Hard water can lead to mineral buildup on the pads, reducing efficiency. Consider using a water softener or periodically cleaning the pads with a descaling solution. Algae growth can also be an issue; specific algaecides safe for greenhouse use can be added to the sump.
- Pad Saturation: Ensure the pads are evenly and consistently wet, but not waterlogged. Adjust the water flow from the header pipe if necessary.
Regular Maintenance Checklist
- Daily/Weekly: Check water level in the sump, inspect pads for even wetting.
- Monthly: Clean the water reservoir/sump to remove sediment, debris, and algae. Inspect pads for clogs, damage, or excessive mineral buildup. Check the pump and fan for proper operation and strange noises.
- Seasonally (Pre-Summer): Thoroughly clean the entire system. Replace any damaged or severely clogged pads. Ensure all seals are intact.
- Seasonally (Post-Summer/Winterization): Drain the entire system, clean the sump and pads, and store any removable components if your greenhouse is not heated through winter. This prevents freezing damage and prolongs component life.
- Pads Replacement: Evaporative cooling pads typically last 3-5 years, depending on water quality and usage. Replace them when they show significant degradation, clogging, or reduced cooling efficiency.
Troubleshooting Common Issues
- Poor Cooling Performance:
- Is the fan sized correctly for your greenhouse?
- Are the pads fully and evenly wet? Check the pump and header pipe.
- Are there air leaks around the pads or fan? Seal them.
- Is outside humidity too high for evaporative cooling to be effective?
- Are the pads clogged with minerals or algae? Clean or replace them.
- Excessive Humidity:
- Ensure your exhaust fan is adequately sized and running.
- Consider adding a humidistat to control pump operation.
- Reduce watering frequency if possible.
- Algae Growth:
- Regularly clean the sump and pads.
- Use a greenhouse-safe algaecide in the water.
- Ensure the pads dry out periodically (e.g., at night) if possible, to inhibit growth.
Conclusion
Implementing an evaporative cooling pad system is one of the most effective, energy-efficient, and economical ways to manage temperature in a small greenhouse. By understanding its principles, carefully selecting the right components, and diligently maintaining the system, you can provide your plants with the ideal climate they need to flourish, even when the summer sun is at its most intense. Take control of your greenhouse climate, extend your growing season, and enjoy the peace of mind that comes with a perfectly cooled environment for your cherished botanical collection.