The gentle hum of a well-controlled greenhouse often belies a silent, continuous struggle against an invisible enemy: heat. While we design greenhouses to capture sunlight and warmth, excessive heat can quickly turn a nurturing environment into a plant-stressing oven. The good news? You don’t always need an army of fans and air conditioners to keep things cool. With smart design, you can harness the power of nature itself through passive cooling, creating a naturally temperate haven for your plants. This article will guide you through the principles and practical considerations for designing a greenhouse that maximizes passive cooling flow, ensuring optimal growing conditions with minimal energy input.
Understanding the Science of Passive Cooling
Passive cooling in a greenhouse is primarily about controlling heat gain and facilitating natural ventilation. It relies on fundamental physical principles to move hot air out and draw cooler air in without mechanical assistance. Understanding these principles is crucial for effective design.
The Stack Effect (Chimney Effect)
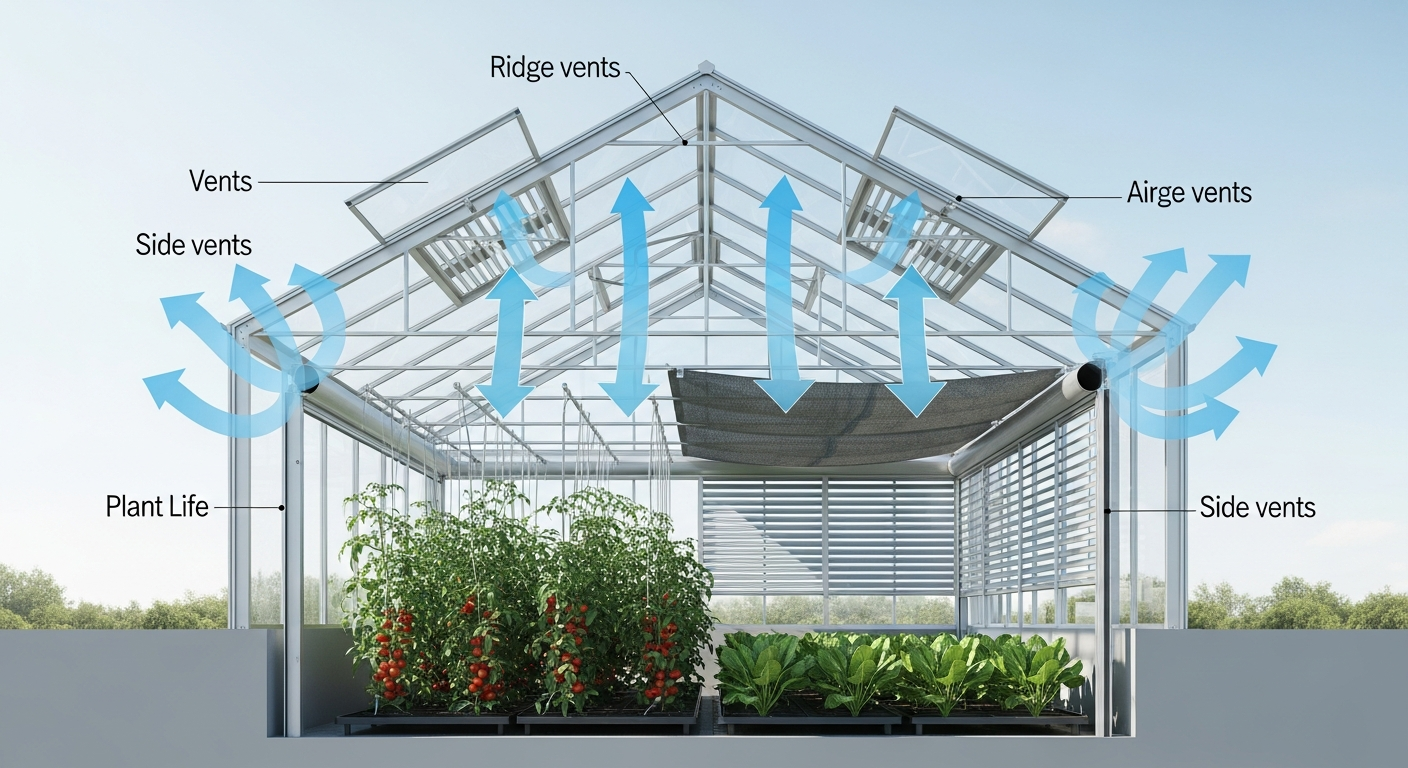
This is the cornerstone of most passive cooling strategies. Hot air is less dense than cool air, causing it to rise. In a greenhouse, sunlight heats the air inside, making it buoyant. If you provide openings at the base of the greenhouse and at its highest point (the ridge), the hot air will naturally escape through the top vents, creating a vacuum that pulls cooler, denser air in through the lower vents. This continuous cycle of rising hot air and incoming cool air creates a natural, self-sustaining airflow, much like a chimney.
Convection and Air Movement
Beyond the stack effect, general air movement, or convection, plays a vital role. Proper design encourages uniform air distribution throughout the greenhouse. Stagnant pockets of hot, humid air can lead to fungal diseases and stress plants. A well-designed passive system ensures a gentle, constant breeze, even on still days, helping to dissipate heat and regulate humidity.
Radiation and Thermal Mass
Heat also enters and leaves the greenhouse through radiation. Sunlight directly heats surfaces inside. Minimizing direct solar gain and utilizing thermal mass can help regulate temperatures. Thermal mass materials (like water or concrete) absorb heat during the day and slowly release it at night, evening out temperature fluctuations. While not directly “cooling flow,” it reduces the amount of heat that needs to be removed by airflow.
Key Design Elements for Maximizing Natural Ventilation
The architecture of your greenhouse is the primary determinant of its passive cooling capabilities. Thoughtful planning here will pay dividends in energy savings and plant health.
Greenhouse Orientation and Shape
- Orientation: For most regions, orienting the greenhouse with its long axis running east-west can minimize direct summer sun exposure on the broad side walls, reducing heat gain. However, if your primary concern is winter heating, a north-south orientation might be preferred. It’s a balance.
- Height: Taller greenhouses enhance the stack effect. A greater vertical distance between the intake vents and the ridge vents means a stronger draw for hot air. Aim for a peak height that allows for effective air stratification.
- Roof Pitch: A steeper roof pitch (30-45 degrees) can improve the stack effect by allowing hot air to rise more easily to the ridge. It also sheds snow more effectively and maximizes winter sun penetration.
Strategic Placement and Sizing of Ventilation Openings
This is arguably the most critical aspect of passive cooling design. The quantity, size, and location of your vents dictate the efficiency of your natural airflow.
- Low Inlet Vents: These should be placed along the side walls, close to the ground, to draw in cooler, denser air. They can be louvers, hinged panels, or roll-up sides. For optimal performance, the total area of your inlet vents should be at least 15-20% of your greenhouse floor area. Consider placing them on the leeward (downwind) side during prevailing summer winds to avoid drawing in excessively hot air.
- High Outlet (Ridge) Vents: These are essential for the stack effect. Located at the very peak of the roof, they allow hot air to escape. The total area of your ridge vents should also be 15-20% of the greenhouse floor area, ideally matching or exceeding the inlet vent area to prevent bottlenecks in airflow. Continuous ridge vents are more effective than spaced individual vents.
- Cross Ventilation: While the stack effect is primary, don’t underestimate the power of cross-ventilation, especially in hoop houses or simpler designs. Having large openings on opposing side walls allows wind to directly sweep through the structure, flushing out hot air.
- Automated Vents: For consistent temperature control and peace of mind, consider investing in automatic vent openers. These use a wax or fluid cylinder that expands and contracts with temperature changes, opening and closing vents without electricity.
Glazing Materials and Shading Solutions
The material you choose for your greenhouse skin and how you manage incoming solar radiation significantly impacts internal temperatures.
- Glazing Type: While all glazing transmits sunlight, some materials have properties that help manage heat. For instance, twin-wall polycarbonate offers better insulation (reducing heat loss in winter) and can diffuse light, which helps prevent hotspots. Low-emissivity (Low-E) glazings can reflect infrared radiation, keeping the interior cooler in summer.
- External Shading: The most effective way to reduce heat gain is to prevent the sun’s rays from even entering the greenhouse.
- Shade Cloths: Available in various densities (e.g., 30%, 50%, 70% shade), these can be deployed externally over the roof during the hottest months. Manual or automated systems allow you to retract them on cloudy days or during cooler periods.
- Deciduous Trees: Strategically planted deciduous trees on the south and west sides of your greenhouse can provide natural summer shade while allowing winter sun to penetrate after they lose their leaves.
- Paint/Whitewash: Specialized reflective paints or even diluted whitewash can be applied to the exterior of the glazing in spring to reflect sunlight. This is a low-cost, effective solution, though it reduces light levels.
- Internal Shading: Movable shade screens or curtains inside the greenhouse offer flexibility. They can be deployed during peak sun hours and retracted when more light or warmth is desired.
Integrating Other Passive Strategies
While ventilation is key, other passive elements can complement your design and enhance overall temperature stability.
Thermal Mass for Temperature Regulation
Thermal mass helps to buffer temperature swings by absorbing excess heat during the day and releasing it slowly at night. This can reduce the peak daytime temperature and prevent night-time dips.
- Water Barrels: Large, dark-colored water barrels placed strategically inside the greenhouse are excellent for thermal mass. Water has a high specific heat capacity, meaning it can absorb a lot of heat without a significant temperature change itself.
- Concrete or Stone Flooring/Walls: A concrete slab floor or interior stone/brick walls can act as significant thermal mass, absorbing heat from direct sunlight and radiating it back when the air cools.
- Earth Berming: Building the north side of your greenhouse into an earth berm can insulate it and provide some thermal mass benefit, though its primary role is insulation.
Evaporative Cooling (Passive forms)
Evaporation has a cooling effect, and this can be harnessed passively to some extent.
- Wet Floors/Pathways: Hosing down concrete or gravel paths on hot, dry days can provide a subtle evaporative cooling effect as the water evaporates. This also increases humidity, which can be beneficial for many plants.
- Water Features: A small pond or water feature within the greenhouse can contribute to evaporative cooling, especially if it’s shaded to prevent excessive heating.
Practical Tips for Enhanced Performance
- Consider Local Climate and Prevailing Winds: Design should always be tailored to your specific microclimate. Understand your region’s average temperatures, humidity, and prevailing wind directions during the growing season. Place inlet vents to catch cooler prevailing winds if possible, but ensure they don’t funnel in unwanted hot air from heat sources.
- Monitor and Adjust: Even the best design needs fine-tuning. Install thermometers and hygrometers in various locations within your greenhouse to monitor performance. Be prepared to adjust vent openings, shading, and watering practices based on real-world conditions.
- Keep Vents Clear: Ensure no plants, equipment, or external obstructions block your ventilation openings. Clear pathways for airflow are crucial.
- Internal Layout: Avoid placing large, solid objects directly in the path of anticipated airflow, especially between inlet and outlet vents. Allow for good spacing between plants to facilitate air circulation around them.
Conclusion
Designing a greenhouse for maximum passive cooling flow is an investment in sustainability, energy efficiency, and ultimately, the health of your plants. By embracing the principles of the stack effect, strategic ventilation, intelligent shading, and thermal mass, you can create an environment that naturally regulates its temperature, reducing reliance on costly mechanical systems. A well-designed passive cooling system minimizes heat stress, prevents disease, and fosters robust growth, allowing you to enjoy a thriving green sanctuary year-round with nature’s own gentle touch. Take the time to plan carefully, understand your climate, and implement these strategies, and your greenhouse will thank you with a bounty of happy, healthy plants.