As the days grow shorter and temperatures plummet, maintaining a warm and thriving greenhouse can become an energy-intensive and costly endeavor. Traditional heating methods often rely on fossil fuels, contributing to a carbon footprint that many environmentally conscious growers aim to reduce. But what if nature itself offered a powerful, off-grid solution to keep your plants cozy through the coldest months? Enter the fascinating world of compost heating. Harnessing the exothermic process of decomposition, compost heat provides a remarkably efficient, sustainable, and entirely natural way to warm your greenhouse, offering energy independence and a rich byproduct for your garden. Dive with us into understanding and implementing this ancient yet innovative technique for year-round growing.
The Science Behind Compost Heating: Your Natural Greenhouse Boiler
At its heart, compost heating is a marvel of microbiology. When organic materials like wood chips, straw, leaves, and manure are mixed in the right proportions with adequate moisture and oxygen, a bustling community of microorganisms, primarily thermophilic bacteria, gets to work. These heat-loving microbes break down complex organic compounds into simpler forms, and in doing so, they release energy in the form of heat.
This biological furnace can reach impressive temperatures, often between 120°F and 160°F (49°C and 71°C) in an actively working pile. What makes this process so suitable for greenhouse warming is its consistent, long-lasting heat generation. A well-built, large compost pile can actively produce heat for several weeks or even months before needing to be turned or recharged. Unlike a wood stove that requires constant feeding, a compost pile generates warmth through a steady, self-sustaining biological reaction, making it an ideal candidate for off-grid, passive heating systems. Furthermore, the byproduct is nutrient-rich compost, ready to nourish your greenhouse beds or garden, creating a truly circular, regenerative system.
Designing Your Compost Heating System for the Greenhouse
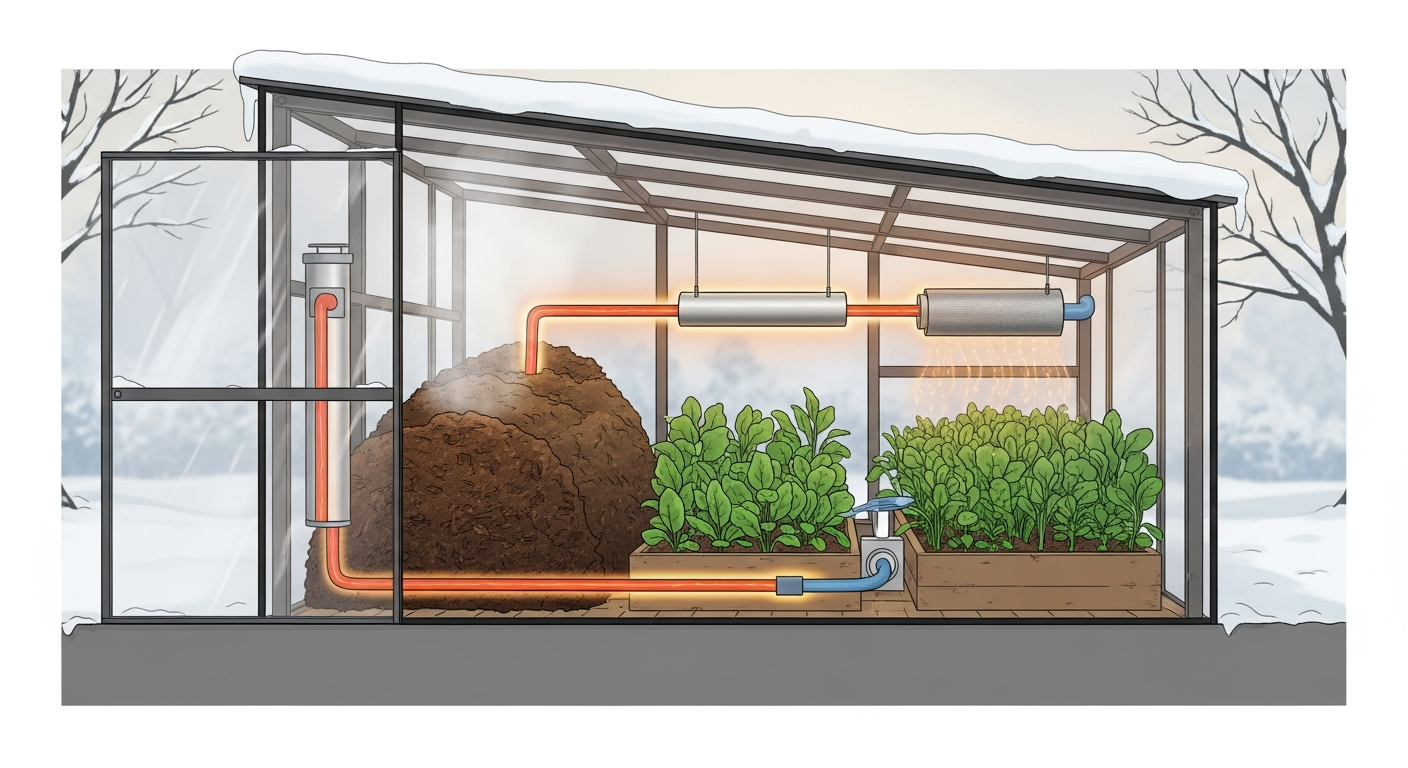
Implementing a compost heating system requires thoughtful planning to maximize heat transfer and efficiency. There are generally two main approaches: hydronic (water-based) or air-based systems, though hydronic is usually more effective for greenhouses.
Choosing the Right Location and Size
- Location: Ideally, your compost heat pile should be located as close to your greenhouse as possible to minimize heat loss during transfer. It can be built directly adjacent to a greenhouse wall, or even integrated beneath a raised bed inside the greenhouse itself for direct earth-warming, provided you have good ventilation. For larger systems, an external, well-insulated pile is often preferred.
- Size: For consistent, reliable heat, size matters. A minimum volume of 3 to 4 cubic yards (approx. 80-100 cubic feet or 2.3-2.8 cubic meters) is generally recommended to achieve and maintain thermophilic temperatures. Larger piles will generate more heat and sustain it for longer periods. Think of a pile roughly 6 feet long, 6 feet wide, and 4-5 feet high.
Building the Compost Pile: The Heart of the System
The success of your compost heating system hinges on building a hot, active pile. This is where the famous Jean Pain method comes into play, utilizing large volumes of woody biomass.
- Materials: You’ll need a balance of “browns” (carbon-rich materials like wood chips, straw, dried leaves, sawdust) and “greens” (nitrogen-rich materials like fresh grass clippings, manure, food scraps, fresh plant trimmings). A good rule of thumb is a Carbon-to-Nitrogen (C:N) ratio of 25-30:1. Wood chips are excellent as a primary “brown” source due to their long decomposition time, providing sustained heat. Manure (especially horse or cow) is a powerful “green” activator.
- Layering: Build your pile in layers, alternating greens and browns. Wet each layer thoroughly as you build, aiming for the moisture content of a wrung-out sponge. Insulate the outer edges of the pile with straw bales or old carpets to retain heat.
- Aeration: Microorganisms need oxygen. Building a pile with coarse materials like wood chips naturally creates air pockets. You can also insert perforated pipes vertically into the pile during construction to encourage airflow, or simply turn the pile periodically.
Integrating Heat Exchange: Getting Warmth into Your Greenhouse
Once your pile is built, you need a way to extract and transfer that heat into your greenhouse. The most common and efficient method involves a hydronic (water) loop.
- Water Pipes: Embed a continuous loop of durable, heat-resistant piping (PEX tubing is excellent, copper can also be used but is more expensive) through the core of your compost pile during construction. Ensure the pipes are evenly distributed to maximize heat absorption. Aim for at least 100 feet of pipe for a moderate-sized system.
- Circulation System: Connect this pipe loop to a small, low-wattage circulation pump (often found in solar hot water systems). This pump will push water from a small reservoir (or directly from the pipes) through the compost pile, where it gets heated, and then into your greenhouse.
- Heat Dissipation in the Greenhouse: Inside the greenhouse, the heated water can be routed through:
- Radiators: Standard household radiators or fin-tube baseboard heaters work well.
- Under-bench heating: Pipes run directly beneath plant benches.
- Radiant floor heating: Pipes buried beneath the greenhouse floor, providing consistent warmth to plant roots and the air.
- Water storage tanks: A large water tank can act as a heat sink, absorbing heat during the day and radiating it slowly at night.
Step-by-Step Implementation: Building Your Compost Heater
Ready to get your hands dirty? Here’s a simplified guide to constructing your own compost heating system:
1. Gathering Your Materials
- Carbon Sources: Large quantities of wood chips (fresh is great), straw, shredded leaves, aged sawdust.
- Nitrogen Sources: Fresh manure (horse, cow, chicken), fresh grass clippings, green plant trimmings.
- Water Source: A hose with good pressure.
- Piping: 100-200 feet of 1/2-inch or 3/4-inch PEX tubing (rated for hot water).
- Pump: A small, efficient circulator pump (e.g., Grundfos or Taco).
- Reservoir/Expansion Tank: If using a closed-loop system, or a bucket for an open system.
- Heat Exchanger: Radiator, baseboard heater, or simply coils of PEX for under-bench heating in the greenhouse.
- Thermometer: A long-stem compost thermometer is essential.
- Insulation: Straw bales, old blankets, tarps for the outside of the pile (optional but recommended for colder climates).
2. Constructing the Pile and Embedding Pipes
- Prepare the Base: Choose a well-drained, level spot. Lay down a layer of coarse woody material (e.g., branches) for initial aeration.
- Start Layering: Begin with a 6-12 inch layer of “browns,” followed by a 2-4 inch layer of “greens.” Wet each layer thoroughly until it’s uniformly moist but not waterlogged.
- Embed the Pipes: As you build up the pile, strategically lay sections of your PEX tubing. Start from one end, coil the pipe through the central mass of the pile, ensuring it’s not too tightly wound and has good contact with the composting material. Leave enough pipe length at both ends to connect to your pump and greenhouse system. Avoid placing pipes directly at the very bottom or edges, which tend to be cooler.
- Continue Layering: Cover the pipes with more layers of browns and greens, wetting each. Build your pile to your desired size, ensuring the pipes are well-covered within the hottest zone (typically the core).
- Insulate (Optional): Once the pile is built, you can stack straw bales or other insulating materials around its sides to help retain heat, especially in very cold climates.
3. Connecting to Your Greenhouse
- Run the Lines: Dig a shallow trench to run the PEX lines from your compost pile to your greenhouse. Bury them to protect them and minimize heat loss.
- Install the Pump: Install your circulation pump on the return line (the cooler water going back into the compost pile). Connect one end of the compost loop to the pump’s inlet and the other end to the outlet of your heat exchanger in the greenhouse.
- Connect Heat Exchanger: Install your chosen radiator, under-bench coils, or radiant floor system within the greenhouse and connect the PEX lines.
- Fill and Bleed: Fill your entire system with water. You may need an expansion tank and a bleed valve at the highest point of the system to remove air pockets, which can hinder circulation.
- Test: Once the compost pile starts heating up (usually within a few days to a week), turn on your pump and monitor the temperature difference between the water entering and leaving the compost. Adjust pump speed if necessary.
Maximizing Efficiency and Troubleshooting Your Compost Heater
Like any living system, a compost heater requires a little attention to perform optimally.
Monitoring Temperature and Moisture
- Temperature: Use your compost thermometer to regularly check the internal temperature of the pile at various depths. Aim for a consistent range of 120-160°F (49-71°C). If it’s too cold, it may need more nitrogen or moisture. If it’s consistently above 160°F, it might be too compact or have insufficient oxygen, requiring turning.
- Moisture: Squeeze a handful of material from the pile; it should feel like a wrung-out sponge. If it’s dry, add water. If it’s soggy, it needs more dry browns and aeration.
Turning and Recharging
Eventually, the most accessible carbon and nitrogen will be consumed, and the pile will cool down. To revive it:
- Turning: Physically turn the pile, bringing the outer, cooler material to the center and breaking up any compacted areas. This reintroduces oxygen and reinvigorates microbial activity.
- Recharging: Add fresh “greens” and “browns” to the pile, especially if it’s been active for many weeks. This provides a new food source for the microbes, sparking renewed heat generation.
Common Issues and Solutions
- Pile not heating up:
- Too dry: Add water evenly.
- Too wet: Add more dry browns for bulk and aeration.
- Lack of nitrogen: Add more fresh greens or manure.
- Too small: Increase pile size.
- Pile heating too fast/too hot:
- Too much nitrogen: Add more browns.
- Too dense: Turn the pile to introduce more air.
- Poor heat transfer to greenhouse:
- Air in the pipes: Bleed the system.
- Pump issues: Check if the pump is running and properly sized.
- Insufficient pipe in pile: The pipes might not be picking up enough heat. Consider rebuilding the pile with more pipe, or ensure it’s in the hottest zone.
Additional Benefits
Beyond natural heating, your compost pile offers other significant advantages. The resulting compost is a rich, living soil amendment that boosts plant health, improves soil structure, and reduces the need for synthetic fertilizers. Some systems also capture the nutrient-rich leachate, known as “compost tea,” which can be used as a potent liquid fertilizer for your plants.
Conclusion
Embracing compost heat for your greenhouse is more than just a heating solution; it’s a commitment to sustainable, off-grid living and a testament to the power of natural cycles. While it requires an initial investment of time and effort, the long-term benefits are substantial: reduced energy bills, minimized environmental impact, and a continuous supply of nutrient-dense compost for your garden. By understanding the science and applying practical techniques, any dedicated greenhouse enthusiast can harness this ancient wisdom to create a warm, productive oasis even in the depths of winter. Experiment with different materials, monitor your pile, and enjoy the profound satisfaction of growing with nature, powered by the incredible warmth of decomposition.