Summer in a greenhouse can be a double-edged sword. While the abundant sunshine fuels lush growth, extreme heat can quickly turn your plant haven into a scorching inferno, leading to stressed plants, stunted growth, and even fatalities. Traditional air conditioning can be prohibitively expensive and energy-intensive for greenhouses. Fortunately, there’s an elegant, energy-efficient, and surprisingly simple solution: the wet wall, also known as an evaporative cooler or swamp cooler. This DIY project harnesses the natural power of evaporation to dramatically drop internal temperatures, making summer an enjoyable season for both you and your plants. Let’s dive into how you can build a cost-effective wet wall to keep your greenhouse cool and thriving.
Understanding the Magic: How Wet Walls Keep Your Greenhouse Cool
At its heart, a wet wall system uses the principle of evaporative cooling, a natural phenomenon where the evaporation of water absorbs heat from the surrounding air. This process has been utilized for centuries, from ancient desert dwellings to modern industrial facilities, and it’s perfectly suited for the unique environment of a greenhouse.
The Science Behind Evaporative Cooling
When water changes from a liquid to a gas (evaporates), it requires energy. This energy is drawn from the air around it in the form of heat, effectively cooling the air. A wet wall maximizes this process by passing warm, dry air through a continuously wetted medium. As the air moves through the moist pads, water evaporates, removing latent heat and significantly lowering the air’s temperature before it circulates through your greenhouse. This also naturally increases the humidity, which is beneficial for many greenhouse plants that suffer in very dry heat.
Why it’s Ideal for Greenhouses
- Energy Efficiency: Compared to compressor-based air conditioning, wet wall systems use significantly less electricity, primarily powering a small water pump and an exhaust fan. This translates to substantial savings on your energy bills.
- Cost-Effective: Building a DIY wet wall can be done with readily available, affordable materials, making it an excellent budget-friendly cooling solution.
- Healthy for Plants: Beyond cooling, the increased humidity created by a wet wall system is ideal for many tropical and subtropical plants, preventing leaf scorch and promoting healthier growth. It also reduces plant stress caused by extreme summer heat.
- Simple Operation: Once set up, the system requires minimal supervision, often just ensuring the water reservoir is topped up and the components are clean.
Gather Your Arsenal: What You’ll Need for Your DIY Wet Wall
Building your own wet wall is a rewarding project that doesn’t require specialized tools or extensive construction experience. Here’s a breakdown of the essential materials you’ll need to purchase or repurpose:
Essential Materials
- Wetting Media: This is the core of your system.
- Cellulose Evaporative Cooling Pads: Designed specifically for this purpose, they are highly efficient and durable.
- Coir Mats or Fiber Pads: More budget-friendly options, often available at garden centers. They might require more frequent replacement.
- Layers of Shade Cloth: A very DIY approach, using multiple layers of densely woven shade cloth can work, though less efficiently than purpose-built pads.
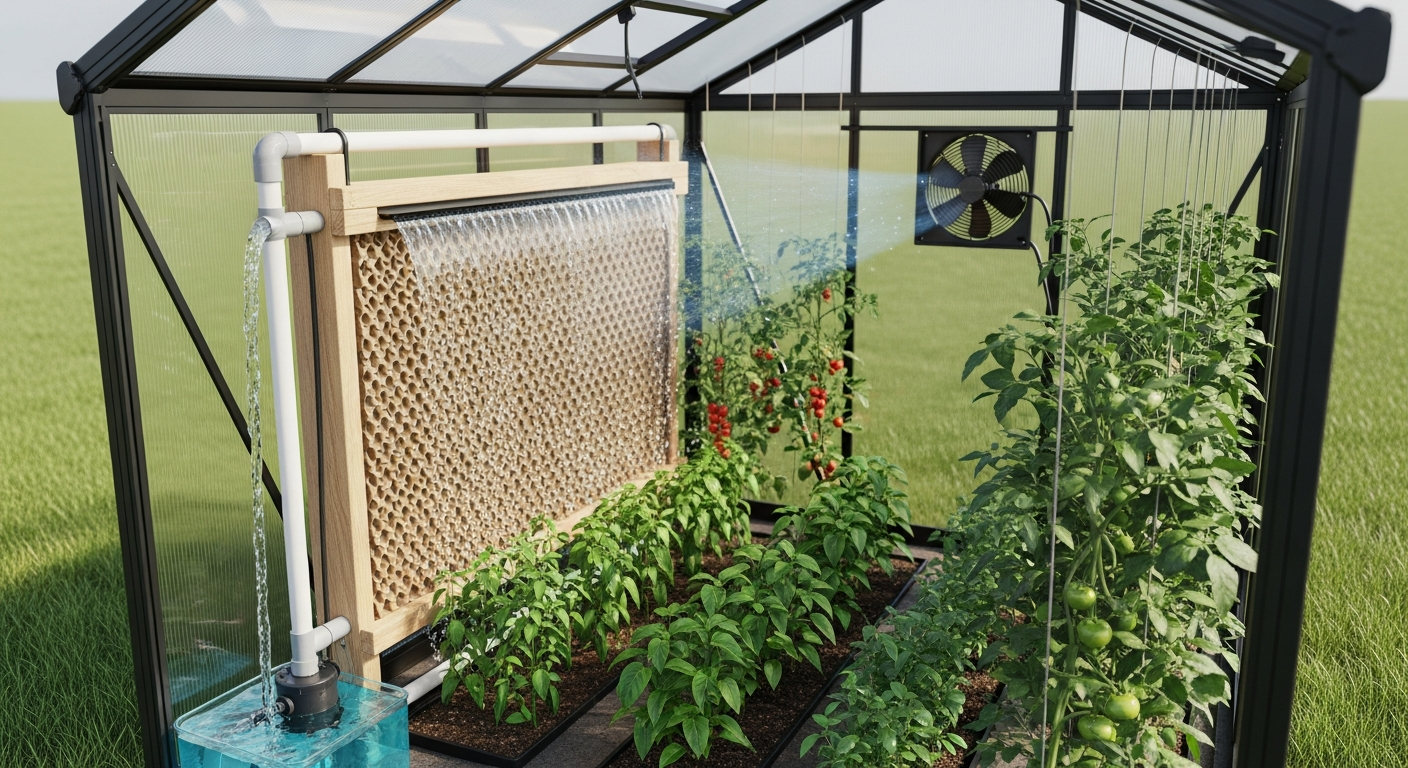
- Water Reservoir: A container to hold the water for your system. Options include a large plastic storage tub, a repurposed pond liner, or even a section of large diameter PVC pipe sealed at the ends. Ensure it’s leak-proof and holds enough water to minimize constant refilling.
- Submersible Water Pump: Choose a pump with an appropriate GPH (gallons per hour) rating to adequately wet your chosen media. For a small to medium greenhouse wet wall, a pump rated 200-500 GPH is often sufficient.
- PVC Piping & Fittings: For creating the water distribution manifold above the wetting media. You’ll need pipes (typically 1/2″ or 3/4″), elbows, T-connectors, and end caps.
- Water Collection Channel: This will sit beneath your wetting media to catch the dripping water and return it to the reservoir. A length of PVC pipe cut lengthwise, a vinyl gutter, or a custom-built trough can work.
- Frame Material: To hold your wetting media and support the entire structure. Pressure-treated lumber, PVC pipe, or aluminum angle are good choices for durability in a humid environment.
- Fasteners, Sealants, & Tools: Screws, zip ties, silicone sealant (waterproof), drills, saws, measuring tape, and basic plumbing tools.
Crucial Companion: The Exhaust Fan
While the wet wall cools the air, an exhaust fan is absolutely critical for the system to work effectively. It creates negative pressure, drawing warm air from inside the greenhouse through the wet wall and expelling hot, humid air out. Without an exhaust fan, the cooled air will simply sit near the wet wall, and the overall greenhouse temperature won’t drop significantly. Place the exhaust fan on the opposite side of your greenhouse from the wet wall for optimal air movement.
Step-by-Step Construction: Building Your Simple DIY Wet Wall
Let’s get hands-on and build your cooling system!
Step 1: Choose Your Location and Frame It Up
Ideally, your wet wall should be placed on the side of your greenhouse that receives the prevailing winds or where fresh air intake is desired. It should be opposite the exhaust fan. Build a sturdy frame from your chosen material (wood or PVC) that is slightly larger than your wetting media. Ensure it’s strong enough to hold the media when wet, the water distribution system, and the collection channel. Make sure the frame allows for easy access to the reservoir for cleaning and maintenance.
Step 2: Install the Water Reservoir
Position your reservoir at the base of the frame, ensuring it is level and sealed to prevent any leaks. If using a pond liner, secure it within a designated area beneath the frame. The reservoir needs to be accessible for pump placement and periodic cleaning.
Step 3: Mount the Wetting Media
Carefully insert and secure your wetting media into the frame. It should fit snugly without large gaps where air can bypass the wet pads. You can use clips, battens, or even zip ties to hold the pads firmly in place.
Step 4: Create the Water Distribution System
- Connect your submersible pump to a length of flexible tubing, then to your PVC piping manifold.
- Construct a horizontal PVC pipe manifold that runs across the top of your wetting media. This pipe should have small holes drilled along its length, spaced every 2-4 inches, facing downwards towards the pads. Start with small holes (1/16″ or 1/8″) and enlarge them if necessary to achieve even water distribution.
- Cap the ends of the manifold pipe.
- Ensure the pump is submerged in the reservoir, and the manifold is securely positioned above the wetting media.
Step 5: Design the Water Collection and Return System
Install your water collection channel (gutter or cut PVC pipe) directly beneath the wetting media. This channel should be sloped gently towards one end, where a return pipe or opening directs the collected water back into your reservoir. This creates a closed-loop system, minimizing water waste.
Step 6: Test and Optimize
Fill your reservoir with water, plug in the pump, and turn it on.
- Check for leaks immediately.
- Observe the water flow: Is the wetting media evenly saturated? If not, you may need to adjust the size or spacing of the drip holes in your manifold.
- Ensure water is efficiently collected and returned to the reservoir.
- Run the system for an hour or two and monitor your greenhouse temperature to gauge its effectiveness.
Maximizing Efficiency & Maintenance Tips for Long-Term Cooling
A DIY wet wall is a fantastic greenhouse cooling solution, but its longevity and efficiency depend on proper operation and regular maintenance.
Paired with Ventilation: The Perfect Duo
As mentioned, a wet wall works best when paired with adequate ventilation. The exhaust fan pulls fresh air through the wet wall, across your plants, and then expels the warmed, humid air. For optimal greenhouse temperature management, consider adding automatic vent openers or a thermostat-controlled exhaust fan to work in tandem with your wet wall. This ensures consistent airflow and prevents excessive humidity buildup.
Humidity Considerations
While increased humidity is often beneficial, some plants (like succulents or certain herbs) prefer drier conditions and can suffer from fungal diseases if humidity levels are too high for too long. Monitor your greenhouse humidity with a hygrometer. If it becomes a concern, you can run the wet wall intermittently, perhaps using a timer, or ensure your exhaust fan is robust enough to exchange air frequently.
Water Quality and Algae Prevention
Stagnant water and constant wetting create ideal conditions for algae and bacterial growth.
- Regular Cleaning: Periodically drain and clean your reservoir, pump, and collection channel to prevent slime and algae buildup.
- Algaecide: A small amount of algaecide specifically designed for ponds or evaporative coolers can be added to the water to inhibit growth. Always choose products safe for plants.
- Media Inspection: Inspect your wetting pads for mineral buildup or deterioration. Heavily calcified pads will lose efficiency and should be replaced.
Winterization
Before freezing temperatures set in, drain your entire system. Clean the reservoir, pump, and pads thoroughly. Store the pump indoors to protect it from frost damage. This will ensure your wet wall is ready for action when the summer heat returns.
Troubleshooting Common Issues
- Uneven Wetting: Check for clogged holes in the distribution pipe, ensure the pipe is level, or increase pump flow.
- Pump Failure: Check for clogs in the pump intake, ensure it’s fully submerged, and verify power.
- Leaks: Inspect all connections and seams, apply more silicone sealant as needed.
- Insufficient Cooling: Ensure your exhaust fan is powerful enough and running, check for air bypass around the wet pads, and verify proper water saturation.
Embracing a DIY wet wall is a smart, energy-efficient cooling solution that empowers you to take control of your greenhouse climates. By harnessing the simple, powerful process of evaporative cooling, you can dramatically lower greenhouse temperatures, reduce plant stress, and help your plants thrive even during the harshest summer heat. With a bit of elbow grease and these practical steps, you’ll soon be enjoying a cooler, more productive growing season without breaking the bank. Your plants (and your wallet) will thank you for this thoughtful temperature management upgrade!